
 |
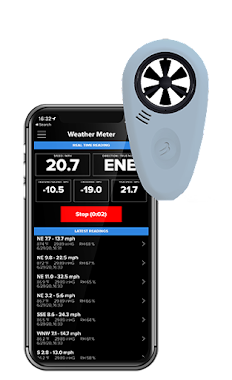
| Weather Meter (from WeatherFlow) |
It is possible with the bike CdaCrr app to use the Weather Meter anemometer (https://weatherflow.com/weather-meter) to improve the CdA precision during a ride or aero sessions.
You will need that your smartphone supports Bluetooth BLE 4.0 (Android 4.3 or newer). The official app to test and play with this anemometer is here.
The Weather Meter (see the whole specifications here and named VM here after) is a highly accurate miniature weather device which records wind, temperature, humidity, pressure. While all of these fields are possibly available in the CdaCrr app, only the wind (air speed on a moving bike) and pressure (in the case the phone has no barometer) is used for the moment by the model.
Once the device is installed on your bike, you will need to calibrate the app to use wind data from WM, in order that air speed given by the device in windless day matches the bike speed. The app provide calibration protocol to find out the calibration factor CF (needed to correct stagnation effects), with RawAirSpeed data provided by the WM device (AirSpeed is used by the virtual elevation method to compute the air drag):
AirSpeed = CF * RawAirSpeed
This value can also be set/corrected manually into the settings.
Where to get the Weather Meter ?
One of the lowest price to buy the device: here.
How to install the Weather Meter ?
To install this anemometer on the bike, you will need a standard 1/4-20 camera mount, like this one (I tested it, seems breakable though). Update: since then, I bought this one and the conception seems very good (more tests to come).
The tricky part is to find a good place on the bike, with no obstacle in front and behind the anemometer. We have tried several locations on the bikes (see here some other examples), but for the moment, and with the lack of intensive tests, we think the best place is how the PowerPod is installed, under the handlebar.
To install this anemometer on the bike, you will need a standard 1/4-20 camera mount, like this one (I tested it, seems breakable though). Update: since then, I bought this one and the conception seems very good (more tests to come).
 |
| Weather Meter mounted on the bike |
How to connect the app to the anemometer ?
Start the CdaCrr app on your bike. Press the white anemometer icon on the top of screen (app toolbar). It will blink until Bluetooth is activated and Weather Meter connected to the app. For that, you will to press once the button on the anemometer. This one will also blink slowly up to the connection to the app (between 1 and 15 seconds).
A steady blue anemometer icon in the app toolbar means the you are ready to use the Weather Meter device (which also does not blink anymore). Several fields (wind, air speed) are now available in the configurable cell between Power and Speed ones:
To stop using the anemometer, just click on the blue icon: you will hear a beep indicating the device is disconnected from the app. Notice that the anemometer icon can't be clicked when riding.
 |
| Click white icon to connect Anemometer is connected |
Watch this video to see how to connect the anemometer to the app.
Possible connection issue: if the blue icon doesn't stop blinking (above 15 seconds), try to turn off the WM device (by a long press on the button), then turn on again (short press). Reboot the phone is also a very good tip.
Possible connection issue: if the blue icon doesn't stop blinking (above 15 seconds), try to turn off the WM device (by a long press on the button), then turn on again (short press). Reboot the phone is also a very good tip.
How to do a calibration ride ?
The first time you would use the anemometer with the app, and each time you change the position of it on the bike, you should do a calibration ride. Update (2019/10/29): There is now two ways to do it:
The new one :
Select the classic lap mode, and do an out and back run, by clicking on the start and at the end, when you return back to the same location. A 1000 meters seems a good length for the run. The app will estimate a calibration factor and ask if you accept the new value. Important: the calibration factor may change quite a lot (1%-2%, so a 2-4% change in CdA) if the anemometer is slightly moved or rotated. So take care to recalibrate each day of testing or if you have bumped the device incidentally.
The deprecated one:
The app may propose you to start this ride at once (after the first connection) or you can long click on the toolbar blue icon on to start a new one (for instance, if your previous calibration ride failed).
The calibration is done with an out and back ride on a flat and straight venue (~200m seems the lower limit to collect enough points). You will try to accelerate from 10 to 40 km/h during the first part, brake, turn to come back, and accelerate again from 10 to 40 km/h. You will click at the beginning and the end of this ride (exactly at the same location is not mandatory) and the app will compute the calibration factor with the recorded data:
 |
| Linear regression used by the app for calibration |
If the accuracy is not enough, you will have to repeat the ride up to success. Some tips:
-Choose a low wind day
-Select a venue and ride when there is no cars
-Try to vary speed in the same way in the out and back parts of the venue
-Repeat by increasing the length of the ride
Calibration is tricky, especially if it's windy. So, after several unsuccessful tries, you can average the different calibration factors you got and manually set the mean value into the settings:

 |
| Calibration is done |
When to use the anemometer ?
The primary use of the device on the bike is when you enable the automatic segment mode to monitor CdA during a ride. Without the anemometer, you are monitoring a virtual CdA (model with no wind effect), whereas when the app is connected to the WM measuring air speed, you get a more realistic CdA value, and more informations (wind speed, head or tailwind,...).
The anemometer also improves CdA precision during wind days of field testing when using the two lap modes, especially when riding on a course with cars passing you and introducing some drafting, lowering the apparent CdA.
Limitations after several rides (updated 2020/07/12):
-CdA computed with the WM airspeed is overestimated when you ride in a group or behind the front leader: in this case, the velocity profile is quite complex (and is highly non uniform at the height of the measuring device). Thus, an anemometer (and we guess a Pitot tube too) is unable to pick up a correct velocity for the power drag given by the simplified model: 0.5*AirDensity*CdA*AirSpeed^2*BikeSpeed
-In case of high wind (or low BikeSpeed), the yaw (angle between the bike direction and the air speed vector) is high enough and can't be neglected in the drag model. As we don't measure the yaw (an anemometer only measure the axial air speed), the computed CdA also can be overestimated in this case
-The calibration factor is very sensitive to (very) small changes in the WM positionning. So take care, once the holder positionned, to not incidently bump the WM, you will may not notice immediately and should recalibrate again. A good tip, if you aim for consistance from day to day, is leave the holder on your bike and screw the WM at each new session: it will save you a recalibration:

Update 2021/10/31:
A new model (Windmeter, cheaper ~50$) is available which records only air speed (no temperature). It is supported now by recent app versions (>=4.x).
3 comments:
Hello, i noticed on Amazon that there are many other Bluetooth anemometers. Will the app work with any that are BT or does it need specific ones?
It works only with the Weathermeter anemometer for now.
I moved to a flat, high wind area with only 2 bikable roads and it's driving me crazy. Imagine biking the same route with invisible hills that move and/or invert into valleys.
I'm not a racer. I guess knowing my Cda and Crr during rides may help, but I'm really looking for a standard bike computer with an anemometer add-on. Does that exist?
Could CdaCrr merge with a bike computer program (or better, become a plug-in), to give all functions in one app?
Please add a comment with any links or ideas you have.
Post a Comment