Purpose
Field testing is time consuming. This app aims to accelerate the task by computing on the bike the Coefficient of Drag Area (CdA) or Coefficient of Rolling Resistance (Crr) on several laps carefully done at different speed, using the virtual elevation method (see here for the theory). The app is free but some features are locked. You will need a key to unlock the premium version.
Requirements
- The app should be installed on an Android phone
- The phone should be set on the handlebar. We highly recommend this one (universal, solid, cheap).
- The bike should have ANT+/BLE power and speed sensors (except if you have a PowerTap hub)
- A network connection is required to get weather station data and upload the CSV files for post analysis
Protocol
The virtual elevation method is described in practice in this thread. It is recommended to read it if you are not familiar with field testing. The app can be used to do CdA field testing (laps at high speed), or Crr field testing (laps at slow speed). Each lap with an average speed between 16 km/h (10 mph) and 32 km/h (20 mph) will be rejected. These values may be changed into the settings thoiugh.
App use
When the app is launched, the BLE devices are scanned immediately and if found, you can click to connect or discard the device (see also these video for the first connection):
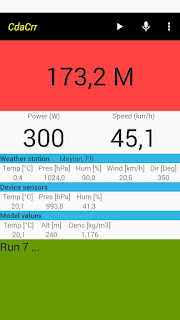
Once the power and speed sensors are connected, the red button switches, according to the selected mode to "START RUN" or "AUTO START RIDE":
In the middle part of the screen, environmental data from the nearest weather station and possible device sensors are also shown. At least, the values used in the model are indicated.
See here how to change the mode or add different data on the screen.
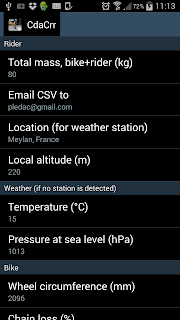
 Before your first run, check all the settings in the menu. You would change at least the mass and your location (in order for the app to detect the nearest weather station). If no weather data is retrieved (in a zone with no network for instance), it is interesting to provide local altitude, temperature and barometric pressure to let the app estimate the air density. You can also hide some environmental data (to have a bigger green part on small screens for instance) by deselecting "Show all data". The other settings you could change are:
-wheel circumference (default 2096 mm)
-chain loss (default 2%). This figure will only be used for crank or pedal power-meters
-an estimation of Crr (default 0.003) for the CdA runs
-an estimation of CdA (default 0.4) for the Crr runs
-...
Crr or CdA measure

Now you are ready to start your run. A good advice is to first try to measure the Crr of your tires (and refine the base estimate of the Crr in the settings) during this run. Ride slowly on a loop (the length should be at least 100 meters) several times.
For that, once you cross the mark you defined to begin the run, click "START RUN" and complete the whole loop, before clicking again on the red button, each time you finish a lap. After a lap is completed, the Crr value of the previous lap is printed into the green part at the bottom of the screen.
During the lap, the current distance is written on the red button.
Clicking each lap is defined as the "lap classic mode". There are some other modes, like the "defined lap length mode" for velodrome testing or the "training mode" to monitor CdA on the fly during a ride. See here for more details.
Once you decide to finish the run, just stop the bike and after 3 seconds, the red button will return to "START RUN" and some statistics (mean, root mean square, CV) for the run will be printed. With good experience, you would obtain CV of 5% (resp 2%) for Crr (resp CdA) field testing.
At the end of the run, it is possible, at this moment to record via a voice message, some information of the run (tested configuration, if a car drafted you during a lap, etc...).
During a run, it is not possible to access the settings or to record a message.
Once the session is finished, you can get the CSV files (by mail via the menu) to a post analysis, for example with the Aerolab tool of Golden Cheetah software to double check the CdaCrr results.
Some advices for field testing
And, during a field testing session, always remember the three rules: no wind, no car, no brake.
If you are drafted by cars on your testing location or have a bit of wind (less than 10 km/h), you will take advantage of connecting an anemometer on your bike. See here for more information.
Ride safe, and enjoy.


10 comments:
Please make this wonderful app Bluetooth compatible (BLE)
Hello, thanks for your comment. I would like to know which BLE only sensors are you using, to see if it is possible to add more support.
The app will support BLE/ANT+ speed and power sensors very soon.
Hello,
I have purchased the premium version.
My power meter connects and my cadence just fine to the app. My speed sensor will not connect. The speed sensor has a new battery and connects to other devices, just not to the cracrr app. I have checked the box in the app to0-- "prefer ANT+ sensors"
It is a Garmin GSC 10. I get this error on screen-- " ANT+ is not natively supported"
If this sensor is not supported please recommend what works.
Please help.
Thanks, Brian
Hello Brian, as indicated on the Google store, the old Garmin SC 10 is not supported:
-Garmin (Warning: old Ant+ Garmin model is not working with the app)
So, you can try ant recent Ant+, BLE, or Ant+/Ble speed sensor. For instance:
-Wahoo
-CooSpo
Thank you. I now have it working with a new speed sensor.
I have a couple more questions below---
1. My main goal is to use your app to monitor CDA "live" during a time trial.
Is that possible in TT mode? I assume I need to purchase a WM to do it?
I currently do not have a WM, so no CDA shows up, I am assuming that is why.
Please recommend a different way if TT mode is not the best to monitor live CDA.
2. Is the current WM model (the cheaper grey colored one) supported in your app.
Just want to verify that it will work before I purchase.
Thanks, Brian
Hello Brian,
2) Yes the grey colored one works, I have one. But warning, some users have reported that recent models (2022-2023), blue or grey, can't be connected to the app.
1) In the TT mode, you will have only a mean CdA value at the end of the race. If you want CdA "live", you will use "Training mode", connect a WM and a BlueFly variometer to the app. Then you will have a CdA "live" with a 46-60s rolling average value.
Hello!
Curious if this is still being supported. I've downloaded the 4.10 version for Android but it seems the key for premium is no longer listed on the store. IIRC I have a premium version on an older phone but can't access that key.
Has the issue with the new weather meter SDK/connectivity been sorted for android?
Thanks!
Hello Jordan, please send an email to bikecdacrr@gmail.com, you will receive the key. Unfortunately, the new WM issue hasn't been fixed.
Post a Comment